


Constellations Quilt Tutorial
Several people left comments or have emailed to ask me about the pattern I used for my Constellations Quilt. I actually just kind of winged it so after a couple of requests I thought I'd write up a rough tutorial.
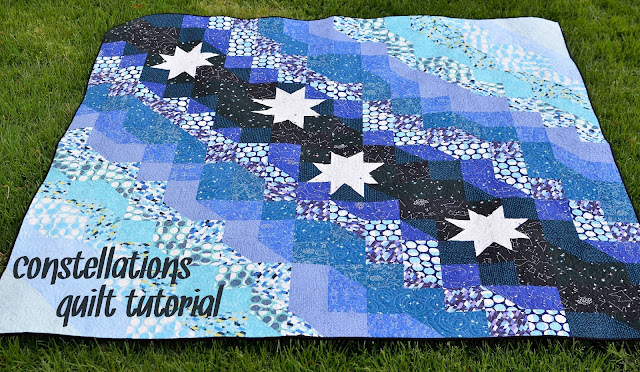 Since I was making this quilt for my husband who wanted a large quilt, this tutorial makes a quilt that is 81"x81". I used a half yard bundle of Constellations fabric by Lizzy House. It is getting pretty impossible to find in its entirety, but you could use other prints and I think that solids would look really great. Here are a few places where I found the fabric still in stock:
If you decide to make a project with this tutorial, please share it with me. I would love to see it!

- Pink Castle Fabrics has 2 half yard bundles in stock and you can use coupon code Bundle25 for 25% off bundles this weekend. They also have 1 fat quarter bundle.
- Sew Modern has all but one of the prints in stock.
- Westwood Acres has a fat quarter bundle of 15 of the prints. You could make a smaller quilt with the fat quarters.
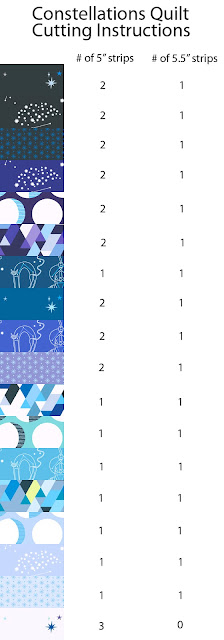
1. The quilt is actually pretty simple to make because it is mostly made of squares and half square triangles. From each fabric cut 5" and 5.5" strips by the width of fabric. This is a diagram of how many strips I cut of each fabric:
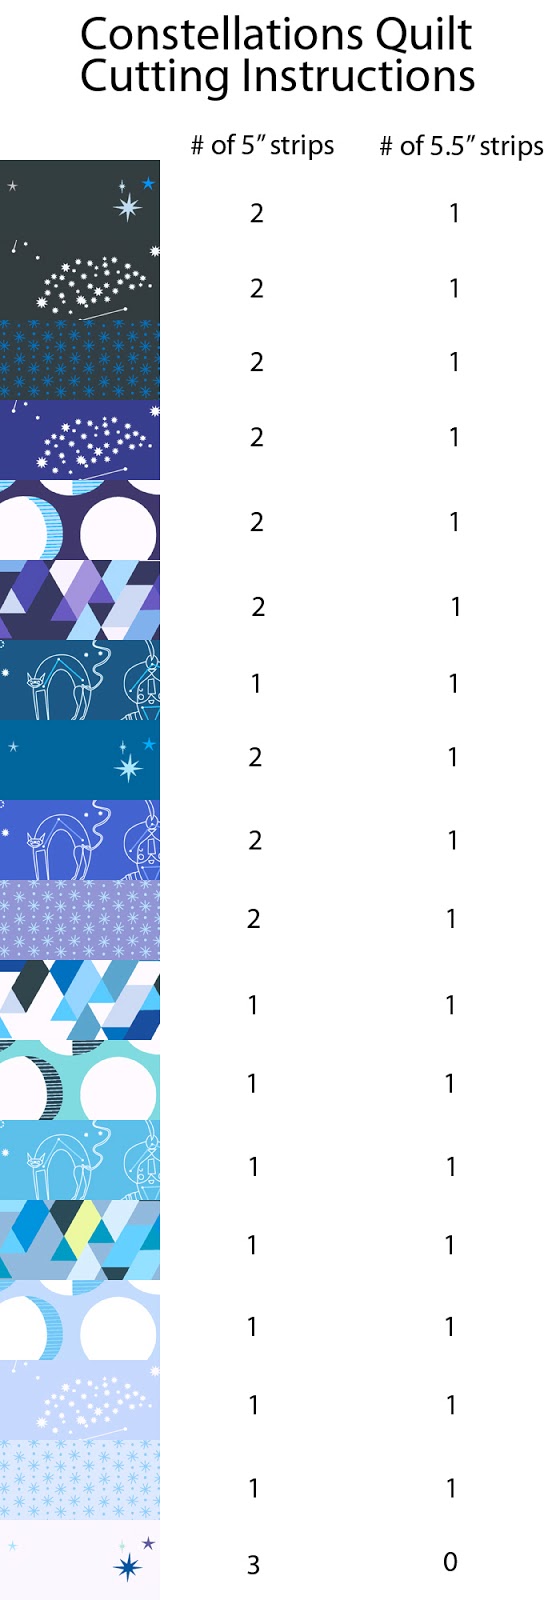
2. Subcut the 5" strips into 5" squares. Subcut the 5.5" strips to 5.5" squares. This is a few more squares that you are going to need for the finished quilt, but it gives you a little wiggle room with your arrangement.
3. The first thing you need to do once you have your fabric strips is make your half square triangles out of your 5.5" squares. Do not make any HSTs out of the white/light gray fabric at the bottom of the cutting list because it will only be used to make the stars.
To decide which fabrics will be paired to make the HSTs, place them in order from darkest to lightest (or however you want yours arranged). I did mine in the same order as the chart. Half of the 5.5" squares from each fabric will be matched with the fabric above it on the chart and half will be matched with the fabric below it. If the fabrics are the same color (the 2 blacks and the 2 darker blues) I considered them to basically be the same print. This doesn't have to be exact. (If you have leftover squares of any of the colors cut them back down to 5" squares to use in the quilt.)
Make these pairs into HSTs. This is a great tutorial. Trim the HSTs down to 5".
4. Set aside 4 of the 5" squares for the center of the stars and then take 16 of the remaining squares and cut them in half on the diagonal to make right triangles.
5. Take 18 of your black squares and lay them into a diagonal on your floor or design wall. Surround them with the remaining black squares. I wanted my quilt to look fairly organic so I just went with what I thought looked good.
6. Decide where you want your stars. I just placed mine randomly, moving the black squares around them, until I was happy with their placement.
7. Use the black square above, to the right, to the left, and below your white/gray star centers to make the stars using this great tutorial. I would recommend using the solid black squares for this and not your half square triangles.
8. This is the fun part. Just start using your HSTs and squares to fill in the space above and below your black diagonal until you have 18 blocks x 18 blocks (or your desired size).
I hope that this tutorial is helpful. If you have any questions (I am writing this at midnight so it might be terribly confusing) just ask and I will try to clarify. You could definitely adapt this to a smaller sized quilt by using fewer squares or making the squares smaller.
If you decide to make a project with this tutorial, please share it with me. I would love to see it!